Cloning a Record Builder Database
You may want to
create a new local database and make it available to cataloguers through
the Record Builder interface provided with Open SiteSearch Database Builder.
The currently recommended method for doing this is to clone (copy and
modify) an existing database framework provided with Record Builder and
then add it to the Record Builder interface.
This topic provides step-by-step instructions for cloning an existing Record Builder database and adding it to the Record Builder interface.
Document Conventions
- <WebZ_root> is the location of the WebZ environment that includes Record Builder.
Before You Begin
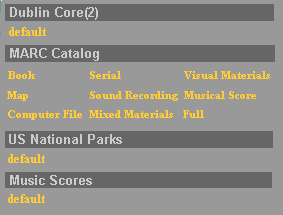
Review the available Record Builder database frameworks (beginning with SiteSearch 4.1.1, these are Dublin Core(2) and MARC Catalog) to determine which one best suits your needs. Here are the database frameworks shipped with Record Builder and their corresponding workforms (data entry forms), as displayed in the Record Builder interface.
Some of the questions to help identify the most appropriate framework include:
- What kind of information are you going to store in the database?
- Will the database contain metadata about and/or digital objects (such as images, sound files, video files, and .pdf files)?
- What data format do you want to use (MARC or Dublin Core(2))?
Procedure
Perform this procedure to clone an existing Record Builder Database and make it available to your cataloguers through the Record Builder interface.
| Note: | You can find a database framework's files in its top-level directory under <WebZ_root>/dbbuilder/dbs. In this procedure, we call this directory <WebZ_root>/dbbuilder/dbs/db_framework. |
| 1. Create a directory for the new database under <WebZ_root>dbbuilder/dbs/ named new_db, where new_db will become the database's top-level directory. | |||||||||||||||||
| 2. Copy the template.xml and recordid.txt files for the database framework you are cloning from <WebZ_root>/dbbuilder/dbs/db_framework into the new database directory that you created in step 1. | |||||||||||||||||
|
3. Which database framework are you cloning?
|
|||||||||||||||||
|
4. Copy the .dsc and .dtd files from the directory for the framework you are cloning to the new directory. Then rename these files, using the new database name. (Be sure to keep the .dsc and .dtd extensions.)
|
|||||||||||||||||
| 5. Modify the .dsc file as you would for any other Database Builder database to define the indexes that you want to create and the routines that you want to use. Also edit the database identification line at the top of the file so that it matches new_db. | |||||||||||||||||
| 6. Register the new database with SSDOT. | |||||||||||||||||
| 7. Initialize the new database with SSDOT. | |||||||||||||||||
|
8. Create a database configuration file for the new database in the <WebZ_root>ini/dbs directory, such as new_db_rb.ini. By convention, names for database configuration files for Record Builder databases contain the characters "_rb" just before the .ini file extension.
|
|||||||||||||||||
| 9. Modify the <WebZ_root>/ini/databases_rb.ini file to add a line referencing the database configuration file for the new Record Builder database. | |||||||||||||||||
|
10. Are you using the Access component for authorization and authentication of staff who work with Record Builder databases?
|
|||||||||||||||||
| 11. Stop and then restart the Record Builder and the WebZ system. For more information, click here for UNIX or click here for Windows NT. | |||||||||||||||||
|
12. Start a Record Builder session in your Web browser and verify that:
|
|||||||||||||||||
| 13. You can now also add or modify records using Record Builder. |
See Also
Database
Building
Record Builder Configuration Files
Performing Online Updates to Local Databases
with Record Builder
SSDOT
Access Component Overview
