The Record Builder Interface in Action
Contents
Introduction
Setting the Stage
Opening an Existing Record for Editing
Editing the Record
Submitting the Record to the Database
This document uses an example to illustrate how the Record Builder application included with OCLC Database Builder performs online updates to a local database. It illustrates how the elements of the Record Builder interface work together during this activity. This document does not provide a comprehensive description of every activity that takes place during a Record Builder session.
You are using Record Builder to edit an existing record in a local database. You begin by conducting a search to locate a record of interest. Record Builder displays the titles of the records that meet your search criteria on the Search Results screen.
Opening an Existing Record for Editing
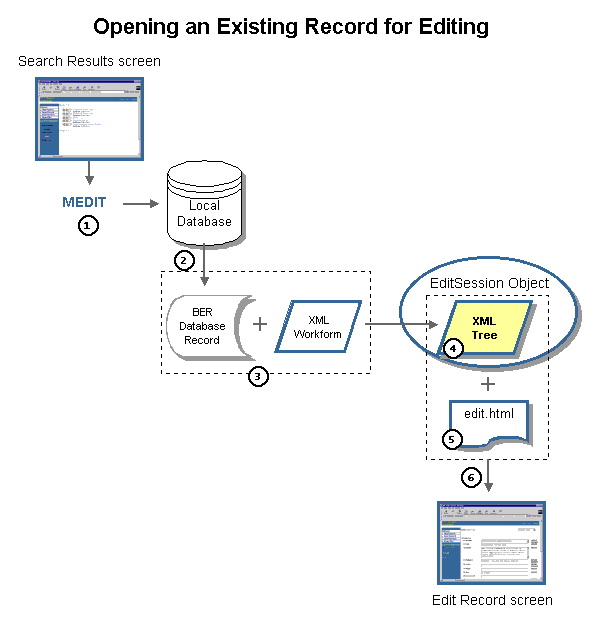
The following
diagram provides an overview of what happens from the time you click a
record's Edit Record icon (![]() )
on the Search Results screen until you
see the record on the Edit Record screen.
The table that follows describes the numbered items in the diagram. Click
each of the items outlined or shown in blue
for more information about that item. Click a number to jump to the description
of that step.
)
on the Search Results screen until you
see the record on the Edit Record screen.
The table that follows describes the numbered items in the diagram. Click
each of the items outlined or shown in blue
for more information about that item. Click a number to jump to the description
of that step.

| Step | Description | |
|
You click the Edit Record icon beside the record you want to edit. The URL syntax in this link includes the WebZ namespace, the mVerb, MEDIT (ORG.oclc.mantis.verbs.MEDIT), your unique session ID, widgets that identify the record in the result set, and the next page to display (edit.html), as in this example:
|
||
|
The MEDIT verb does the following:
|
||
|
MEDIT then merges the database record and the XML workform. MEDIT uses the workform's document type definition (.dtd) file to puts the record's data into the proper fields on the workform. This results in an XML tree (also called a populated XML template) for the record. Even though the database record exists in BER format, the workform allows you to edit the record in a format such as MARC or DC. MEDIT also prepares the record for processing during its edit session. For example, MEDIT obtains and stores information from the record needed during the stages of a record's edit session. |
||
| MEDIT creates a new EditSession object for the record. The EditSession object stores information about the record throughout your current Record Builder session. MEDIT then adds the XML tree to the record's EditSession object and loads the "next" page specified in the URL (edit.html) | ||
|
Like all Record Builder HTML pages, edit.html contains a number of entity references. One of the most significant references is &StyleTable.DHooks.gadget. During entity substitution, this becomes a call to run the RunDHooks gadget (ORG.oclc.mantis.gadgets.RunDHooks). RunDHooks reads the XML tree from the EditSession object and runs all the hooks in the XML tree. In addition to some hooks explicitly specified in the XML tree, some of the parameters in the XML tree itself cause other hooks to run. The hooks generate HTML code for an HTML form with fields that contain data from the existing record, along with a number of buttons created by the hooks. |
||
| The resultant HTML code becomes part of the Edit Record screen that Record Builder displays for you. See Data Entry Fields and Buttons for descriptions of typical fields and buttons on the form. |
You edit the record
as needed. If you take any actions on this screen, such as clicking an
![]() button to add another entry for a repeatable field, Record Builder updates
the XML tree in the record's EditSession
object accordingly. In addition to modifying the XML tree, this also
adds the changes you have made to the record thus far to the XML tree.
button to add another entry for a repeatable field, Record Builder updates
the XML tree in the record's EditSession
object accordingly. In addition to modifying the XML tree, this also
adds the changes you have made to the record thus far to the XML tree.
When you finish editing the record, you select the Submit record option from the Edit Record screen's Available actions list.
Submitting the Record to the Database
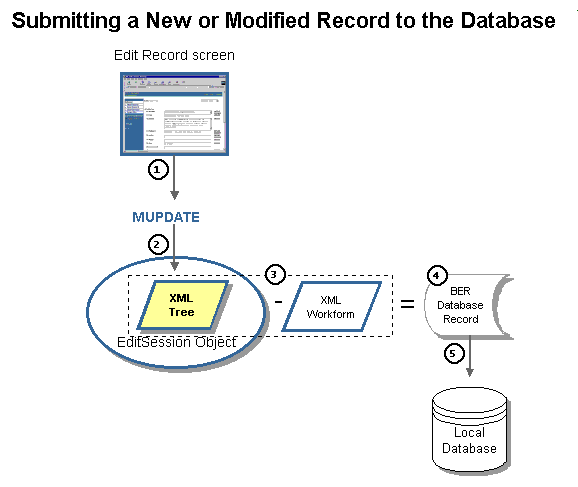
The following diagram provides an overview of the actions that occur from the time you select the Submit record option until you receive a confirmation message that Record Builder successfully added the modified record to the database. The table that follows describes the numbered items in the diagram. Click each of the items outlined in blue for more information about that item. Click a number to jump to the description of that step.

| Step | Description |
| When you finish editing the record, you select the Submit record option from the Available actions list at the top right-hand corner of the Edit Record screen. The URL associated with this option includes a call to the MUPDATE verb (ORG.oclc.mantis.verbs.MUPDATE). | |
|
MUPDATE displays the entire record in read-only format and asks you to confirm that you want to submit the record to the database. |
|
| MUPDATE now checks for differences between the XML tree and the empty XML workform associated with this record. These differences comprise the database record, which MUPDATE extracts from the XML tree. (However, the XML tree remains intact in the record's EditSession object.) | |
|
MUPDATE then converts the record data to BER format and submits a Z39.50 Extended Services request to ZBase to add the updated record to the database. |
|
|
ZBase updates the database and then notifies MUPDATE. MUPDATE:
|
See Also
Record
Builder Process Model and Overview
Performing Online Updates to Local Databases
with Record Builder
Elements of the Record Builder Interface
Record Builder Screens